Part of new fencing will go up without us paying for it!

After we received our new garden designs from Sow & Grow, we realised the first main modification would be to extend the new fencing onto the third side of the garden. Even though we couldn’t remove the privet—it’s not ours!—it would still end up interfering with the greenhouse and shed if we left it open, and would need frequent maintenance: a solid fence would at least hold it back.

You can see the hedge we don’t own on my first End Of Month View, especially in this image:

IMG_20160331_093045_265

Clearly a lot of privet we can only maintain, not remove. We’d just started getting quotes in for the landscaping and fencing (more on that later) and the expense of the fencing (now 50% longer) looked like it was going to be a large part of the cost.

So imagine our surprise when our neighbours on that side said, out of the blue, they were going to remove the hedge and replace it with hit-and-miss fencing! We hadn’t even mentioned our plans to them; but they were getting a new puppy, and the rescue centre said they needed to make the garden more secure to prevent unbearably cute doggy escapes.

Down it started to come:

IMG_20160426_095936_973

Look at that view down the hill!

IMG_20160426_095901_570

OK, there’ll be a fence in its place, but it should still leave us more light (even our low patio on the far side of the house seemed more illuminated towards sunset.)

Eventually it was gone, along with that scrappy section of wall to the left of our parking bay:

IMG_20160427_191936_986

This would’ve got in the way of our proposed shed, so when they asked to take it down to get a mini-JCB in to grub out the privet (“we’ll put it back in if you like”) I jumped at the chance, and please don’t replace it!

Here’s the view up to our existing lean-to, as close as possible to the first image in this post:

IMG_20160427_191955_885

They’re going to completely re-landscape that rather unattractive mound of subsoil next week. But in the mean time, the privet is gone! The privet is gone! Well, one third of it. Next step: speak to our other neighbours…!

Sheffield Botanical Gardens, spring proper

Last weekend we visited Sheffield Botanical Gardens again, last visited in mid-March. All of the spring bulbs were still as jolly as before, but we got a real feeling of the summer perennials stretching their muscles a bit more, and more late-spring flowers kicking off.

Up by the cafe, this impressive, stout Fritillaria imperialis echoed the tulips beneath it impressively:

IMG_20160424_134203_587

This myrtle-like false baeckea (Astartea astarteoides) was beginning to flower last time, but is now putting out more and more of its outrageous blooms:

IMG_20160424_135124_801

This unlabelled tree had lovely acer-like leaves that had an aesculus-like droop to them, as if protecting their blossom from the odd weather we’ve been having (maybe they do!)

Acer-like, with chestnut-style drooping leaves

Back in spring, I counted a single open flower on this monstrous Rhododendron:

IMG_20160424_143633_138

And hidden in a border near the north-west corner of the gardens was Muscari “Valerie Finnis”, which both Alison Levey and (somewhat tangentially) Roy Strong mentioned separately a few weeks ago:

IMG_20160424_144417_663

That minty pale blue was really exciting to see, and overcame the fact that I don’t always like seeing Muscari close up. They’re a better plant in little low drifts, seen at a distance.

There was a lot more to see, but the light was a bit too poor for further photographs. Hopefully we’ll be back there again in a few months, to see what has changed (especially in the rose garden!)

Digging a long trench at Norfolk Park

On Wednesday I was back volunteering at Norfolk Park Community Gardens along with nearly a dozen other garden-minded folks. Nick had asked us to tackle the forest border:

IMG_20160420_115544_783

At the front were the overwintered dead stems of St John’s Wort, Lunaria and others; towards the back there was a large pile of unleveled earth, which brambles and chickweed have colonized with glee despite a Mypex covering:

IMG_20160420_115627_439

To the left and behind the dead stems were, allegedly, some hidden rhubarb:

IMG_20160420_115617_225

It was my task to clear the stems and overgrowth, to get some light and air into the rhubarb crowns; at the same time, we all needed to level the earth, and cultivate it into a long hump with trenches either side, for planting squashes into.

Here’s the finished result with the trench:

IMG_20160420_145730_012

An amazing effort from everyone involved, and I was glad to get dragged away from the rhubarb to do it! The ground sloped down from the earth hump so that, as we levelled it off, I propped up the earth half way down with a couple of bits of wood. We then only levelled as far as that, to make a bit of rudimentary terracing and stop all the earth escaping down the slope and away from the camera.

Elsewhere, here was my progress with the rhubarb:

IMG_20160420_145713_159

All of last year’s annuals were cleared away, and if you look closely, you might see the stems dotted either side of what’s now a relatively clear path. Next week I’ll hopefully expand the cleared area to the left, and reveal yet more historically planted crops. But look again at that trench!

Norfolk Park Community Gardens is open to new volunteers every Wednesday, 10:30–16:00. Note that listings elsewhere saying Thursday are incorrect!

Buddleia cuttings

Buddleia will grow anywhere, right? Here, for example, is one growing in the brickwork above a row of shops in Oxford:

Buddleia in full bloom

But while I’ve had to hack back our own buddleia, it would be nice to be able to transplant it into our new garden, after all the landscaping and fencing has been completed. So today I took a couple of green-wood cuttings.

I found two completely green shoots, with at least three leaf nodes on them, and cut them just below a node. If the mother plant were weak, I would trim the stump back to just above the next node down, but then:

This. Is. Buddleia!

So I left the plant as it was. I trimmed all leaves off the all except the top node. This reduces transpiration until roots have started to grow, from the axial buds which remain at the nodes.

I put two cuttings in opposite corners of a square pot filled with sieved compost, holes dibbed and then soil pushed against the cuttings:

IMG_20160422_113219_681

Then all of this went in a plastic bag, and into the growhouse.

All of the care should be unnecessary, given buddleia’s reputation: but I’ve had cuttings die off in the past, so would really like these to succeed. So fingers crossed they’ll shoot: I’ll be looking for new growth, and maybe for it to start colonizing the brickwork!

Potting up some lettuces, to get succession

As with our recent broad-bean potting-up, I’ve potted up a few (but not all) of our lettuce “Tantan” to start them growing at different rates. This way we get a succession of crops.

The tray of Tantan seedlings was also starting to get a bit crowded:

IMG_20160419_172202_119

So it was good to pot a few on; the only worry is that I might have disturbed the roots of the others. But it’s still early in the season and I’m not focussing particularly on yield, so it should be OK.

Here’s a number of plants all ready to be watered:

IMG_20160419_175028_292

On the left are six pots of heritage peas, just recently sown; I think the variety is “Latvian.” On the right is the somewhat ravaged-looking tray of Tantan seedlings, but they looked rather better after a bit of watering settled their compost again. Hopefully this will be my last year of gardening with quite such reduced space!

Broad beans potted on, not planted out

I’ve planted broad beans in containers before, long before we built our square-metre raised bed at our old house. But until we do the landscaping for our new designs, we really do need to containerize all our veg, which is going to mean pots and pots of… pots.

Here’s how the first batch look, alongside the garlic:

IMG_20160416_165000_611

The canes in each pot are because in the past I’ve had broad bean plants “corkscrew” on me, and frequently fall over even after I’ve pinched out the tips to stop growth. I think the smaller containers towards the front might need potting on again. But this at least means I’m ready for when (if?) someone agrees to come and shift a large amount of earth to make our terraces!

The seven pots you see are only about a third of the broad beans I initially sowed. I’m aware that both potting up, and also leaving pot-bound, can cause a check to growth: I’m hoping these two effects won’t cancel each other out, and so by only potting up a few plants right now I’ll get some kind of succession. We’ll find out soon enough!

Everything lies level to our wish

Since Sheffield Sow & Grow designed a potential new garden for us, we’ve been thinking about how to move ahead: what the next steps might be; and which bit depends on which other bit(s).

It’s clear that the biggest, and (therefore?) probably earliest change we need to make is the landscaping and fencing:

  1. Terracing the existing, rather raggedy slope of 15% or maybe only 10% (depending on how you count the existing drop between the two deckings), possibly with part of it being a sloping, miniature lawn, possibly meadow-planted.
  2. Replacing the privet (on the two sides we own it) with a trellis and airy fence above concrete blocks to hold back the soil, and probably fencing along the privet on the remaining side to check its growth.

But how to proceed from Julieanne’s detailed but “ingredient-focussed” plan, to something more basic and stripped down that we can talk solely to landscapers about? We need to be able to think very clearly and purely in terms of relative ground heights compared to some zero level (let’s say the paving nearest the house.)

A possible mind-clearer, of all except a particular measurement, occurred to me; a false-coloured version of the layout diagram, representing only that one measure:

Plan 22Jan15 Stacey and Griffin Garden elevation

On the left, you can see Julieanne’s original plan; on the right is my false-coloured elevation plan (neither are perfectly to scale, but are intended to be a way of communicating with designers and landscapers, respectively!)

You can hopefully see in the false-colour plan, from bottom to top:

Pale red/white: ground lower than zero
The driveway slopes down from the back garden, represented by a gradient tending to white.
Red: ground at zero
The paving, and the hard standing for the shed on the left, is all at effectively zero height (the house internal flooring is about 20cm higher, of course.)
Yellow: first terrace (60cm)
The existing stone walling by the house, stripped of the decking, is around this height, which would then cut in for a couple of metres behind the shed.
Green: second terrace (120cm)
Starting from the one below it being cut in slightly from currently, this terrace will be higher than the current ground, over to the left with the raised beds.
Green to blue: slope (120–180cm)
On the right, the terrace slopes up from 60cm above the first terrace, to the height of the third. This is a remaining bit of 15% slope.
Blue: third terrace (180cm)
At the very back is our third terrace, which will be built up near the house to be the same height as at the very back of the current garden. On the right, it will be dug in by 50–60cm, to house the new compost bins.
Purple: elevated items (180+cm)
The greenhouse hard-standing, and the compost bins (with possibly a green roof) will be higher than the terrace on which they sit, obviously.
Black: major buildings much higher than anything
The house is effectively excluded from “raw landscaping” discussions, so it’s coloured black to “ignore” it.

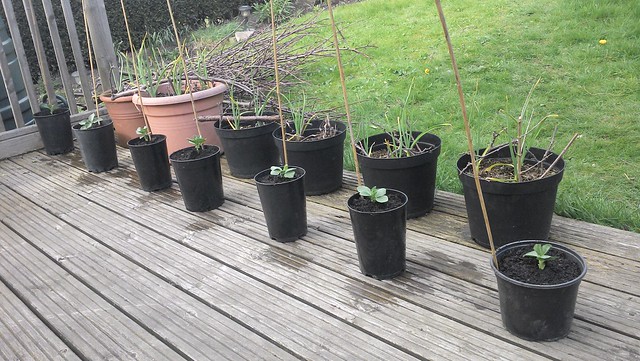
I laid out canes at 4-metre intervals in the current garden, to get some feel for where the terraces might be (not including the slope):

IMG_20160407_095048_440

The decking would disappear, and the ground lowered about 15cm as far as the nearer-house line of canes; it would then rise 60cm, to bury most of the lawn and the probably-stump of the apple tree; then it would rise another 60cm at the next line of canes, to the height of the brick compost bins on the left and continue on to where the privet will no longer be!

I also wanted to get a feel for the the 15% gradient, given it remains in the “meadow slope”. Right now, there’s no straightforward example in the garden, but there was a “15%” street sign near Wincobank recently, which led me to photograph this otherwise unedifying picture of such a slope to get some idea of how it might feel:

IMG_20160403_163938_891

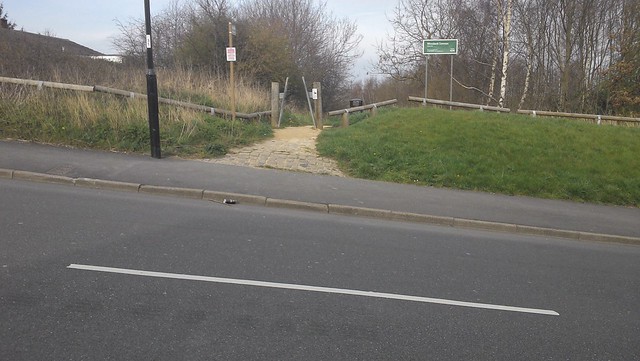
(Only after taking this photograph did I spot the picturesque empty beercan in the gutter. Please disregard.) This gradient looks OK to me: it’s definitely a slope you can sit on, and fairly easily mow or strim a four-metre-squareish patch.

I think I now know how the elevations are going to work. Whether or not they’re feasible from a landscaping perspective (e.g. holding back slopes, or including steps of sufficient width to be comfortable) is probably another matter! But at least I can now start the conversation with some landscapers. And with the neighbours, if only to be polite!

Pruning a euonymous to imagine underplanting

Today’s sunshine—after the frost had cleared—meant that I could enjoy a long day out in the garden. It was great!

Because we’re planning to eventually redesign of most of the fixed elements of the back garden, I’ve been loath to do too much pruning in this our first year living in the house. No point pruning what might be removed anyway!

But while it’s nice to have a long-term plan, it’s also always important to focus on the next square metre, and here’s a particular square metre of our garden currently occupied by a vast euonymous:

IMG_20160410_151713_239

Wait, make that three distinct euonymice:

IMG_20160410_151724_704

(One above and two below.)

The long-term plan is to underplant something with ferns here, so while it’s unlikely we’ll keep the euonymization in the long run, but right now we really want to try to visualize how things might look when we come to changing things over.

I therefore removed the lower two euonymates entirely, and then pruned the upper one. I tried to prune every third branch back to its central tangle, rather than trim it like topiary; I also tried to lift the canopy by entirely pruning out lower wood, to get a feel for it being a taller plant. When I was done, I added a few more stones to the wall, to level it off a bit (especially now there’s fewer roots there to bind it all together.)

The result looks pretty good:

IMG_20160410_171140_113

From above, up on the decking:

IMG_20160410_173422_816

Even if we end up with a different plant, the structure is here now. I can just imagine this or something like it, underplanted with maybe some Dryopteris erythrosora and Athyrium niponicum ‘Pictum’, maybe some Hosta or Heuchera types, some Cyclamen and Erythronium for winter and spring colour….

Hardest frost of the season: in April!

I’m not one for documenting every sudden spike in the weather, but this morning most of Sheffield S2 woke up to what I would say anecdotally was the hardest frost of the season.

Until today I thought our garden just happened to be positioned so it would get very little frost, but it turns out not:

IMG_20160410_085902_042

There was a good three or four millimetres of creeping stalagmites of frost there, blindly groping their way up overnight towards the cold blackness of space…. The upper decking was also hit quite hard:

IMG_20160410_085746_478

with frost still in the shadows cast by the garlic pots:

IMG_20160410_085616_775

Most worryingly, the condensation on the growhouse had frozen solid:

IMG_20160410_085849_724

But thankfully my tender lettuce seedlings were still quite happy inside; the broad beans were of course still hardily hurlyburlying themselves out of their seed pods with not a care in the world.

Most interestingly it seemed that the further away from the garden, the harder was the frost: the lower decking by the house got no frost at all. Given that I was expecting our patio decking to be something of a frost pocket, trapping cold air, that in itself is quite an interesting development, and means I might relocate our growhouse down there when we begin our big redesign.